Using Cytoscape from behind an HTTP proxy which requires authentication (authorization)
14th September 2007
Cytoscape 2.5.1 supports proxies, including HTTP proxies, but there is no support for HTTP proxies requiring authentication/authorization. It’s easy to use Cytoscape in the authentication-requiring proxy scenario; below is one possible method.
Note, that exactly the same method can be used to allow any software, which supports proxies but not proxies with authentication, to be able to access the internet.
First, let’s outline what we will do:
- get a proxy which supports on-the-fly modifying of HTTP headers. I used Proxomitron (which is a great tool, BTW!), and recommend using 4.5 June release. You need to have privileges sufficient for installing your local proxy of choice.
- you need to know the ip (or hostname) of your proxy, proxy port, and both user and password for that proxy
First, install your proxy of choice. In this example, I installed Proxomitron.
Second, you need to configure your local proxy and browser. With Proxomitron:
- launch proxomitron
- an eye in a triangle will appear in your taskbar. click it once to bring up the main window:
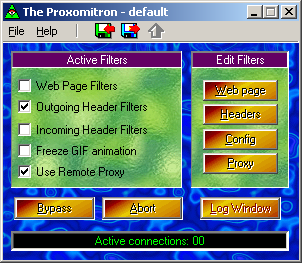
- you need to set the checkboxes as I did on the screenshot above
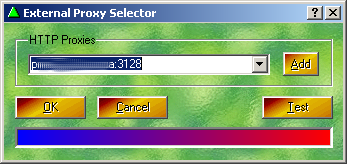
- click the ‘proxy’ button, and enter your proxie’s host and port (semicolon-separated):
- optionally, click ‘config’ in the main window and set desired options, including the default port for local connections (which is 8080 by default)
- configure your browser to use Proxomitron. Set proxy host to localhost, port to 8080 (default). More info on configuring browser proxy is available either in browser manual, or here for older browsers.
Third, you need to know the authentication string sent to your organisation’s proxy server by your browser. You can see that string in the headers your browser sends out at each request. There are multiple ways to see headers. I recommend either using Live HTTP Headers FireFox add-on, or the Proxomitron’s “Log window”. You can also just calculate the hash.
The string you are looking for should be similar to:
Proxy-Authorization: Basic Yi5OLNrVa242Zw5rBzPpZxl1ZxBhDf==
(it is the hash of your proxy user and password).
Here is what you need to do to see this string using Proxomitron (assuming Proxomitron is already launched and main window open):
- launch Proxomitron
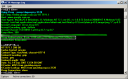
- click the ‘Log Window’ in Proxomitron main window
- now try accessing e.g. google.com in the browser configured to use Proxomitron. You should get usual HTTP authentication form, asking for username and password. Enter correct data here. Now look into the ‘HTTP Message Log’ window – you must be able to locate the string we are looking for:

The last thing you need to do is to add a rule to your proxy to send the authentication header with every request.
With Proxomitron, do this:
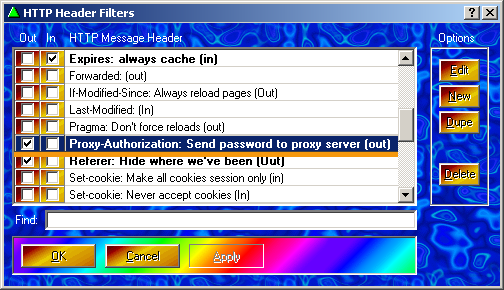
- click the ‘headers’ button:
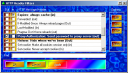
- select the Proxy-Authorization filter, and click ‘edit’
- in the ‘Replacement text’ field, paste yours auth-string (“Basic ….”)
- OK, Apply. Do not forget to set the checkbox in the ‘Out’ column for the Proxy-Authorization rule.
This should be all. Now just open Cytoscape, Edit=>Preferences=>Proxy Server, HTTP, localhost, 8080.
This is it.

June 4th, 2012 at 9:20
Thanx!!!..Helped loads!!